In this blog, we will explore how to establish trust between your Identity Authentication tenant and Okta as a corporate identity provider.
Once the connection between your Okta and the Identity Authentication is done, you can simply use it to connect it to several applications and environments.
Prerequisites
- You have an active license for Identity Authentication.
- Manage Applications and Manage Corporate Identity Providers authorizations are assigned to you as Administrator in IAS.
- You have access to the Okta Admin portal.
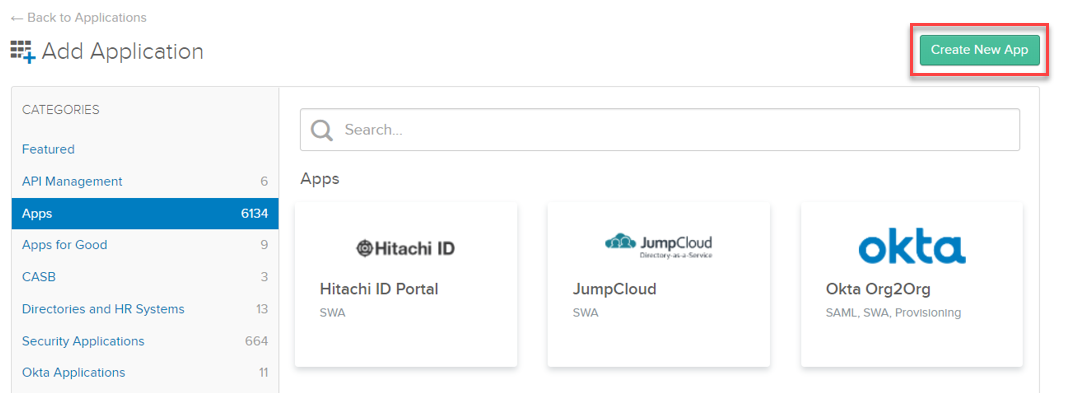
Step 1: Log in to the Okta admin portal and create the SAML 2.0 application
Log in to the
Okta admin portal by going to
https://login.okta.com/ and provide your credentials.

Click on the '
Use single sign on' - '
Add App' option.
Note: in Okta there is no predefined Identity Authentication application, you have to create and configure it manually.
For more information about configuration on the Okta side, refer to official Okta documentation:
Create a SAML integration using AIW (Application Integration Wizard).
In the 'New Application Integration' tab choose
Web as the platform, and
SAML 2.0 as sign on method:
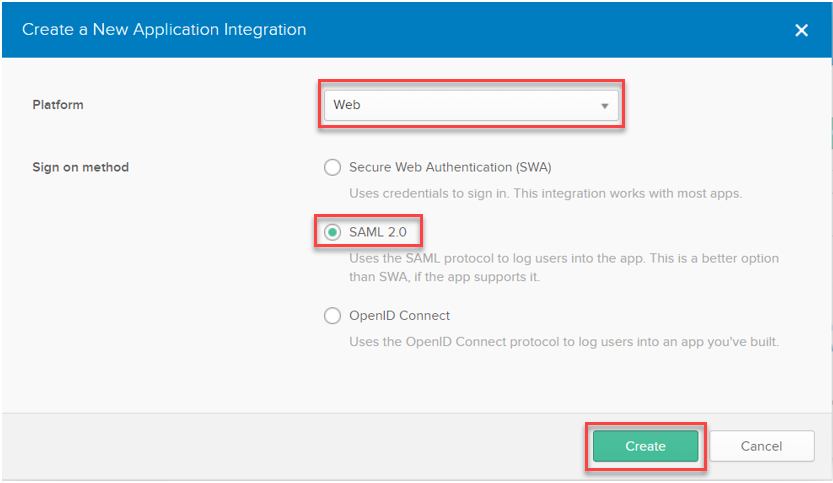
As the last part of the application creation, you can define a custom application name, logo, and visibility. Finally, click the
Next button.

Step 2: Create SAML Integration in Okta
In this step, you have to fill in the SAML settings taken from Identity Authentication. Please pay special attention to all steps taken in this part.
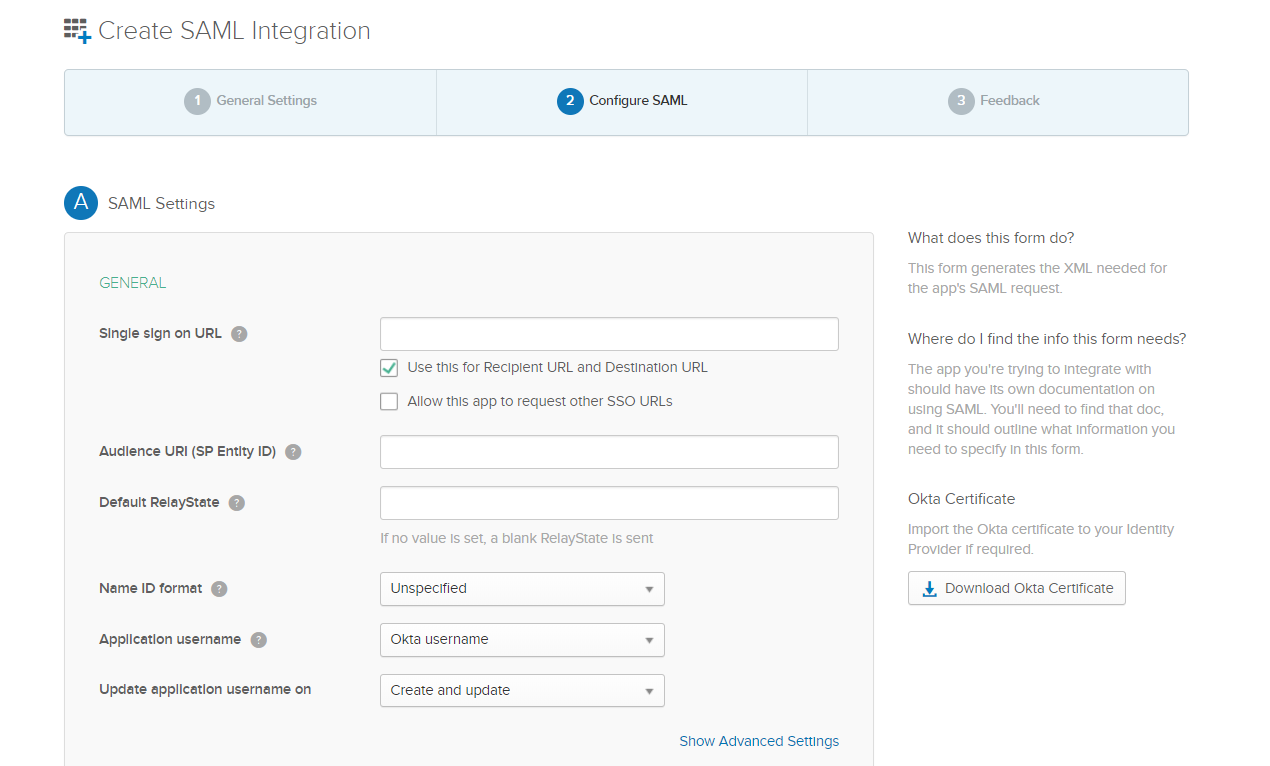
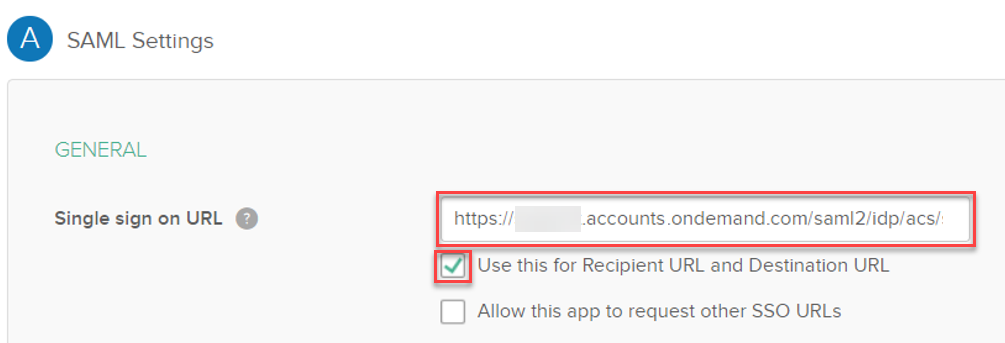
Single sign on URL:
To get URL value, follow steps:
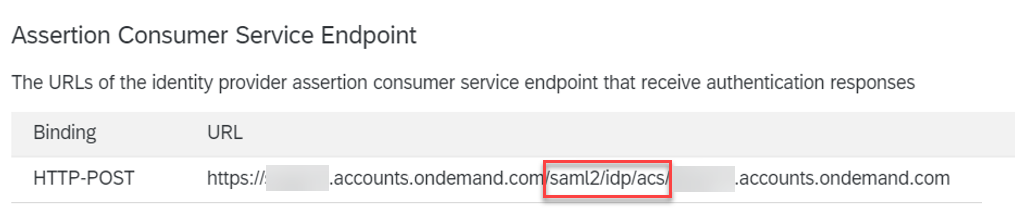
- Open Identity Authentication (IAS) Administration Console: https://<tenantid>.accounts.ondemand.com/admin
- Navigate to the 'Tenant Settings' tile. Click on 'SAML2.0 Configuration'.
- Copy 'Assertion Consumer Service Endpoint' (ACS endpoint) URL.
After copy-pasting the URL,
tick the 'Use this for Recipient URL and Destination URL' option.
*This is for SP-initiated SSO. If you'd like to use IdP-initiated SSO, construct the above 3 URLs like below:
https://<the current ACS endpoint URL>?sp=<sp_name>&index=<index_number>
Request the Entity ID of the service provider, and the index of the application's protected page from the tenant administrator of Identity Authentication.
The index is required.
On Okta it is possible to set both URLs (Allow this app to request other SSO URLs).
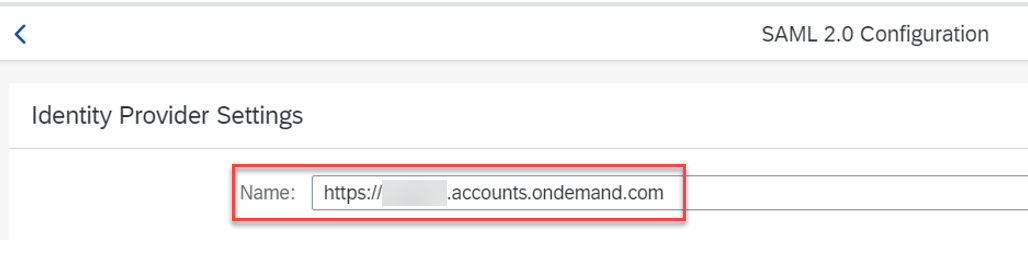
Audience URI (SP Entity ID):
This has to be
identical to the 'Name' value of your IAS tenant.
To get the URL, follow steps:
- Open IAS Administration Console: https://<tenantid>.accounts.ondemand.com/admin
- Navigate to the 'Tenant Settings' tile. Click on 'SAML2.0 Configuration'.
Copy value of the 'Name' field.
Note: Make sure the audience matches exactly as described in KBA 2693814 - Service Provider does not match the specified audience in the SAML2Assertion.
Default RelayState should be empty.
Leave further SAML settings default as well unless there are different requirements.
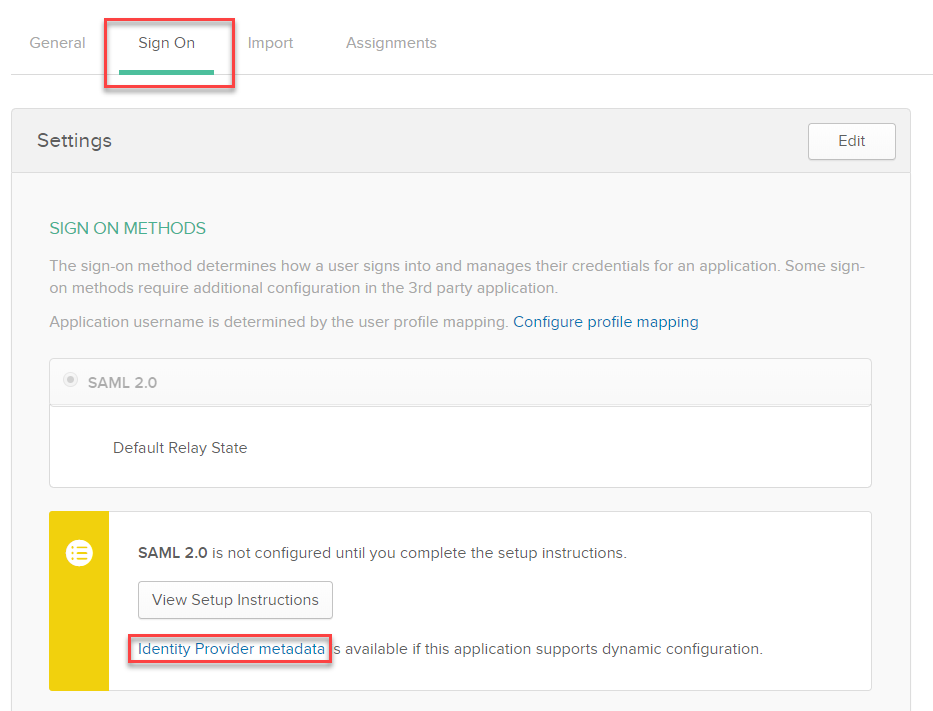
Step 3: Download Identity Provider metadata file from Okta
In Okta navigate to the 'Sign On' tab, then cl
ick the 'Identity Provider metadata' hyperlink to download the metadata in .xml format.
Step 4: Configure trust in the Identity Authentication tenant
In this scenario, the
Identity Authentication acts as a proxy to delegate the authentication to the corporate identity provider. For more information check our official SAP documentation:
Configure Trust with Corporate Identity Provider.
To use Identity Authentication as a proxy to delegate authentication to an external corporate identity provider you have to configure trust with that corporate identity provider.
To configure trust with the corporate identity provider, follow the procedures below:
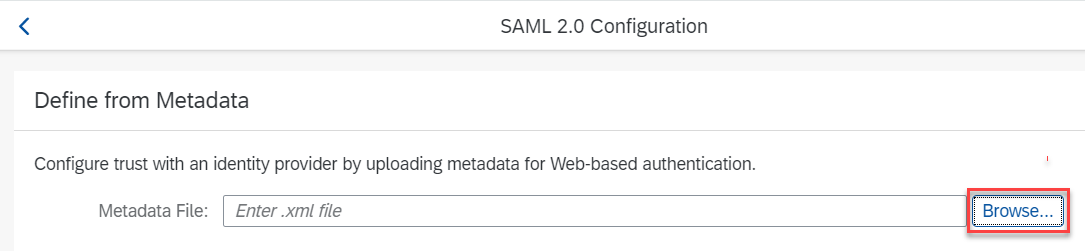
Import the downloaded Okta metadata (from Step 3) into Identity Authentication:
- Open IAS Administration Console: https://<tenantid>.accounts.ondemand.com/admin
- Navigate to 'Corporate Identity Providers' in the submenu of 'Identity Providers'.
- Add Identity Provider with a custom name.
- Choose SAML 2.0 Configuration and import metadata:
Now almost all the required details are filled in:
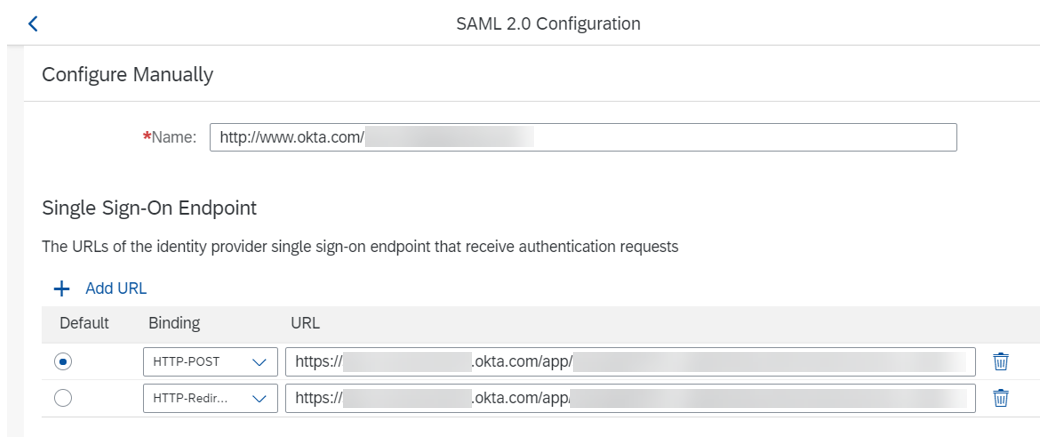
Configure HTTP-POST
Single Logout Endpoint URL with the same value set for the 'Name' value in IAS:
Save the configuration:

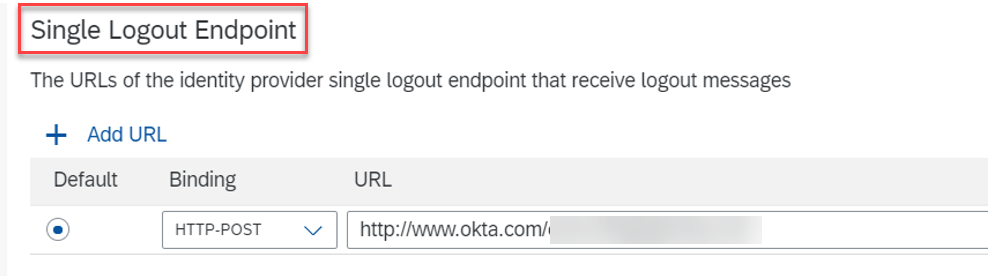
As a tenant administrator, you can specify a link that is sent as an extension in the SAML 2.0
Logout Response. The link can be used by the application to
redirect the user after successfully logging out of the application when
Identity Authentication acts as an identity provider proxy. See our official documentation:
Service Provider Initiated Logout with Corporate Identity Providers.
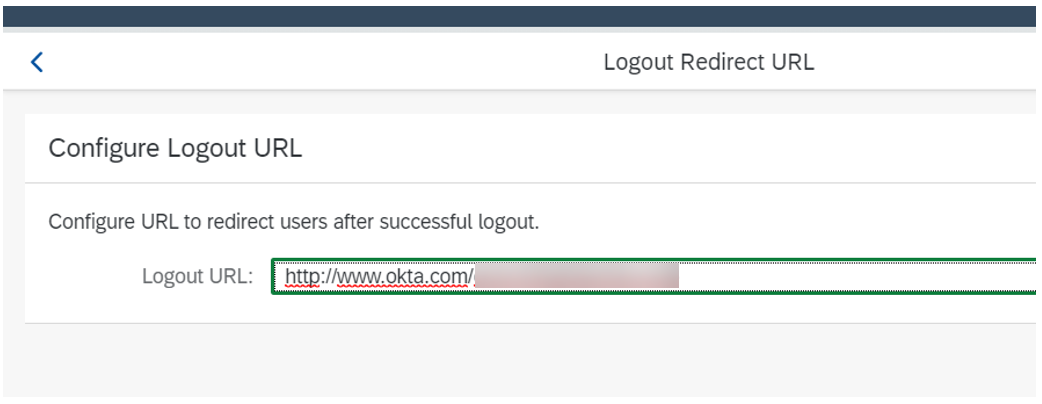
Navigate to the 'Trust' tab and choose the '
Logout Redirect URL' option. Define the desired URL where you want to redirect end-users after successful logout:
Step 5: Connect your application to use Okta as the identity provider
In the Administration Console of your IAS, navigate to 'Applications & Resources' then click on the 'Applications' tab and configure an application or choose an existing one.
Option A: Click on the 'Conditional Authentication' option on the 'Trust' tab of your application. Set your Okta as '
Default Identity Provider'.
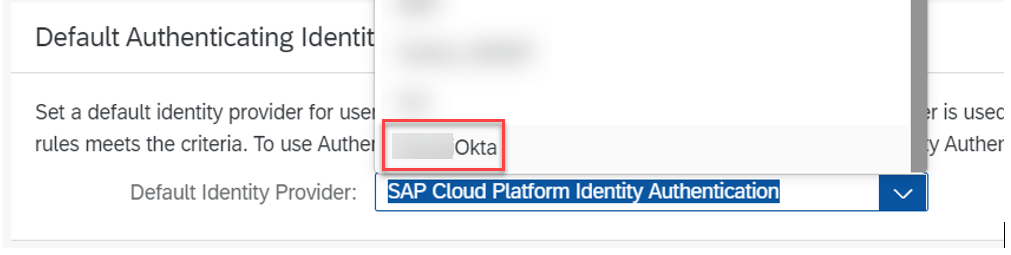
For more information see our official documentation:
Choose a Corporate Identity Provider as Default.
Option B:
Set 'Trust all corporate Identity Providers' on. In this case, you should define Conditional Authentication to redirect users to Okta.

For more information see:
Configure Conditional Authentication for an Application
Summary
After following the above steps, your application should use Okta as a corporate identity provider, and in this case, IAS is acting as a proxy.
Hint: If you are facing issues during configuration, you can download the Troubleshooting logs from your IAS tenant to self-investigate the root cause of the issue. See KBA
2942816 - How to export troubleshooting logs from Identity Authentication.
Also, we advise checking the IAS Guided Answers about the most common issues: KBA
2701851 - Identity Authentication (IAS) - Guided Answers.
